Lesson 4, 28/1/10
In this lesson my group and I started to do our editing task with Adobe Premier Pro CS4, we firstly opened our task and renamed all of our takes so that we can easily find the shots in order. After naming all of takes, we then added them all together and watched through the whole thing. We then decided as a group where to cut the takes and made sure that all of my group and I were happy with the takes and had cut enough off so that the whole video ran and looked good. We then added a few edits to the video and listened to it. After doing that we then decided on what other edits we wanted to add in, the sound we wanted to record and add on and also whether we need to re shoot the last section of the video. As a group we then found out how to make the take look darker and how to add lighting effects to the take, we found this difficult to make it look professional and identical, but we had a go at it and made it look similar to our capabilities. after having a go at trying to sort the lighting out we then decided as a group the other edits and the title screen we wanted to add into the video.
Thursday, 28 January 2010
Wednesday, 27 January 2010
Filming Stage
Lesson 3, 26/1/10
In this lesson we had finish our planning and were ready to film, we had our tape, camera and tripod ready and sorted out. we then briefly look through the storyboard. firstly we set up the white balance, after a few attempts of learning how to pan properly and getting the camera set up we started to film. The filming lasted around 1 hour and a half, after this we were happy with our shots and were confident that we had done this well, after previewing all the takes we had done. we were than taught how to use Adobe Premier Pro and had saved our captured video and it had been put onto our college T drives. My group and I then started on watching some of the takes on the computers and decided to start renaming all of the scenes so that we could find them easily and get them in order.
In this lesson we had finish our planning and were ready to film, we had our tape, camera and tripod ready and sorted out. we then briefly look through the storyboard. firstly we set up the white balance, after a few attempts of learning how to pan properly and getting the camera set up we started to film. The filming lasted around 1 hour and a half, after this we were happy with our shots and were confident that we had done this well, after previewing all the takes we had done. we were than taught how to use Adobe Premier Pro and had saved our captured video and it had been put onto our college T drives. My group and I then started on watching some of the takes on the computers and decided to start renaming all of the scenes so that we could find them easily and get them in order.
Planning Task
Lesson 2, 21/1/10
My group and I started of this lesson with completing our planning and starting our storyboard. We had been told that we have this lesson and next lesson to finish filming and then we have to edit. Firstly we started off by finishing our planning and knowing what we were going to do in this task. We then got onto the storyboard, we decided what we were going to do and the shots we had in mind.
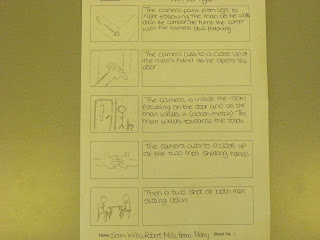
This picture is the first sheet of the storyboard my group and I made, this involves five different shots and the explanation of what we want the shots to be, for example a pan around the corner. we included this information so we could look back at the storyboard so we could follow that as clearly as possible
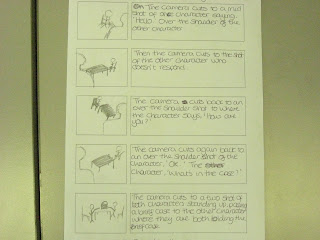
This is the second and final picture of our completed storyboard, as I said above this also includes the information about each shot and what we want them to look like.
After we had completed our Storyboard my group and I decided that we were going to film next lesson as we didn't have to rush it and had a whole 2 hours to film, in the time we had left of this lesson we decided to negotiate the actors and finish writing our blogs.
Thursday, 21 January 2010
The Preliminary Task
Lesson 1, 19/1/2010
In the first lesson we started it off by making our own accounts on this website, so we can create blogs as we go by every lesson and record our data that we made on this. We were then introduced to the coursework which we found out counted to 50% of our AS grade, and got put into groups to make our preliminary task. I got put into a group with Sam Willis and Henna Mistry, we firstly started to produce the spider diagram of the planning for the preliminary task. we have been taught all of the rules about the preliminary task with the 180 degree rule, we have also been shown how to work the camera's especially using the white balance, to make our task best quality.
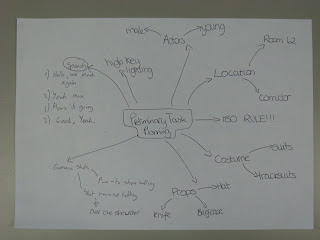
This picture shows the task we got set to do in the lesson, this shows our brief thoughts as we are showing the location, actors, camera shots, dialogue, props and the costumes. We included all of this so we can have a preview of this before we are filming to look back and remember what we wanted to have in the film, this helps my group to keep ideas.
Subscribe to:
Posts (Atom)